Topic 12 Posts

ios

VPN (mobile and desktop): the good and the bad

If you want the best privacy protection as well as great ad tracking prevention on iOS, VPNs are your best bet, although without some caveats.

VPN-on-iOS

First off, let's start with what a VPN means. VPN is a Virtual Private Network which means connecting your remote devices into a single private but virtual network since the devices may not actually be connected directly to each other.

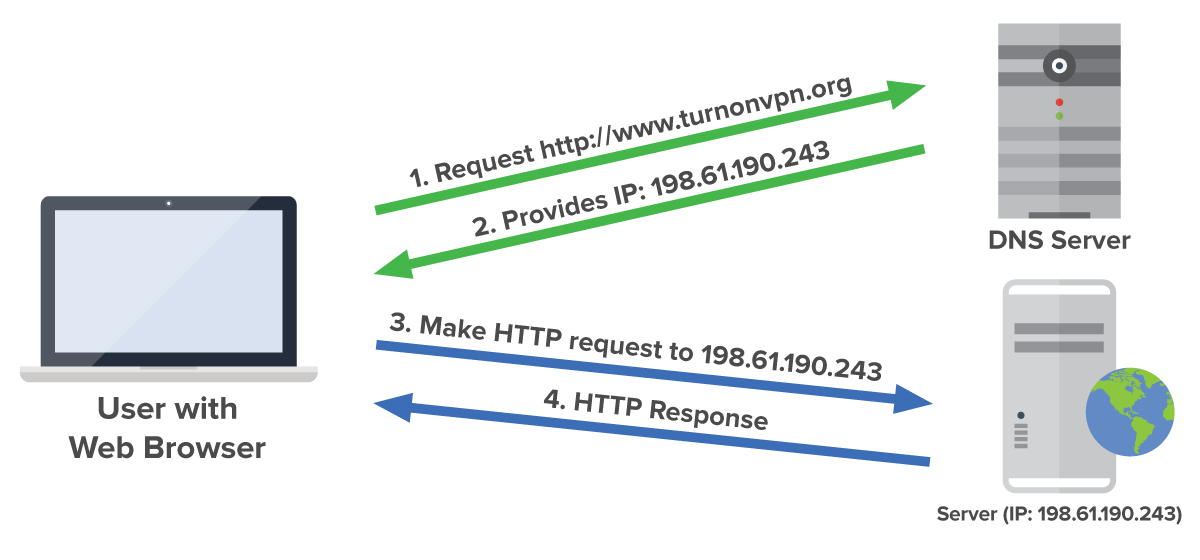
Usually when your device makes a connection to any service, the data you're sending and retrieving travels through dozens of nodes until it reaches the server on the other end. And you can't be sure none of the nodes in between aren't compromised and for example aren't storing your data without your consent. The main advantage of using VPNs is that all of your Internet traffic travels encrypted and is available only to you and the server and no one in between. Of course it's not a bullet-proof solution but it's the best and easiest way to make your data as much unusable as possible to non authorized middleman parties. Especially if you're controlling your VPN, since paid or public VPNs which provide transparency and security might not actually do it and do the exact opposite - log all of your data for their own benefit.

For most of the people, and even for advanced users using a VPN might be overwhelming and hard, especially if you decided to set it up yourself and not to use a public one. And without specific knowledge such setup may be leaking your data even more than no VPN at all. But the manuals like this cover the security basics quite well, as well as some of the public VPN providers hold many years of trust without being revealed in scandals of (un)intentional data leaks.

So using a VPN generally is a good idea - you get your traffic encrypted which keeps your private data safe and as a side effect you get even some ad tracking prevention since even your basic data stops being available to the advertisers who keep their trackers on many websites and services you visit. And if you're using your device to access sensitive data by using public wifi or in countries with regulated Internet access - VPNs are a must for you. Also if you want to access country specific/restricted resources, there is not much choice except using a VPN at all, which in this case would make you have an external IP address that belongs to that country and you will appear like you're browsing from within that region - that's another advantage of using VPNs.

If you plan on using VPNs, secure the most important devices first. But if you can - use VPNs on all of your devices. I tried going this route, but here are some downsides that made me stop using them:

  • Using VPNs on any of the device will make the Internet feel slower. The reason for it is that instead of your packets going directly to the server you're trying to reach they go a longer route through your secure server first, and that adds up delay to each of your web request and as a result everything loads noticeably slower.
  • Also your max speeds might take a hit. With my 250/20 Mbit speeds at home I was getting about 20/10 Mbit using a public VPN since they are often sharing their channels within many users. Setting up your own VPN somewhere with high speed Internet access should make it better, but the delays mentioned before still won't improve much and will also cripple your speeds.
  • The speed hit affects mobile devices connected via cellular the most since those already have a pretty high delay of transferring data through the air. So on mobile the speed slowdown is noticeable the most.
  • The other problem (at least with iOS) is that the device might disconnect from the VPN in the background and leave portions of your background traffic unsecured as well as some traffic before it reconnects after unlocking the phone. From what I understand the VPN disconnects to preserve battery which it uses 10-15% more of than without having an active VPN connection - this in my opinion is also a significant problem with VPNs on the go.

That said, if you need your connections to be secure and untraceable - you still have the option even though it would cost you Internet speed and some battery life, but if you need it in certain circumstations, that's a fair tradeoff.

In my tests I was using Tunnelbear (loved its cuteness and service, until it was purchased with a not very trust McAffee recently), SurfEasy and my new favorite PIA because of their high long standing reputation. And you should care about the reputation of the company that keeps your traffic private 🙂 As for setting up your own VPN - I used DigitalOcean's manual from the link above but with Ubuntu 16.04 instead of 18.04.

If you don't need that level of security and just want to browse the Internet without ads, here's my breakdown on the best iOS and Android adblockers as well as a post on what privacy concerns you should consider while using and adblocker in the first place.

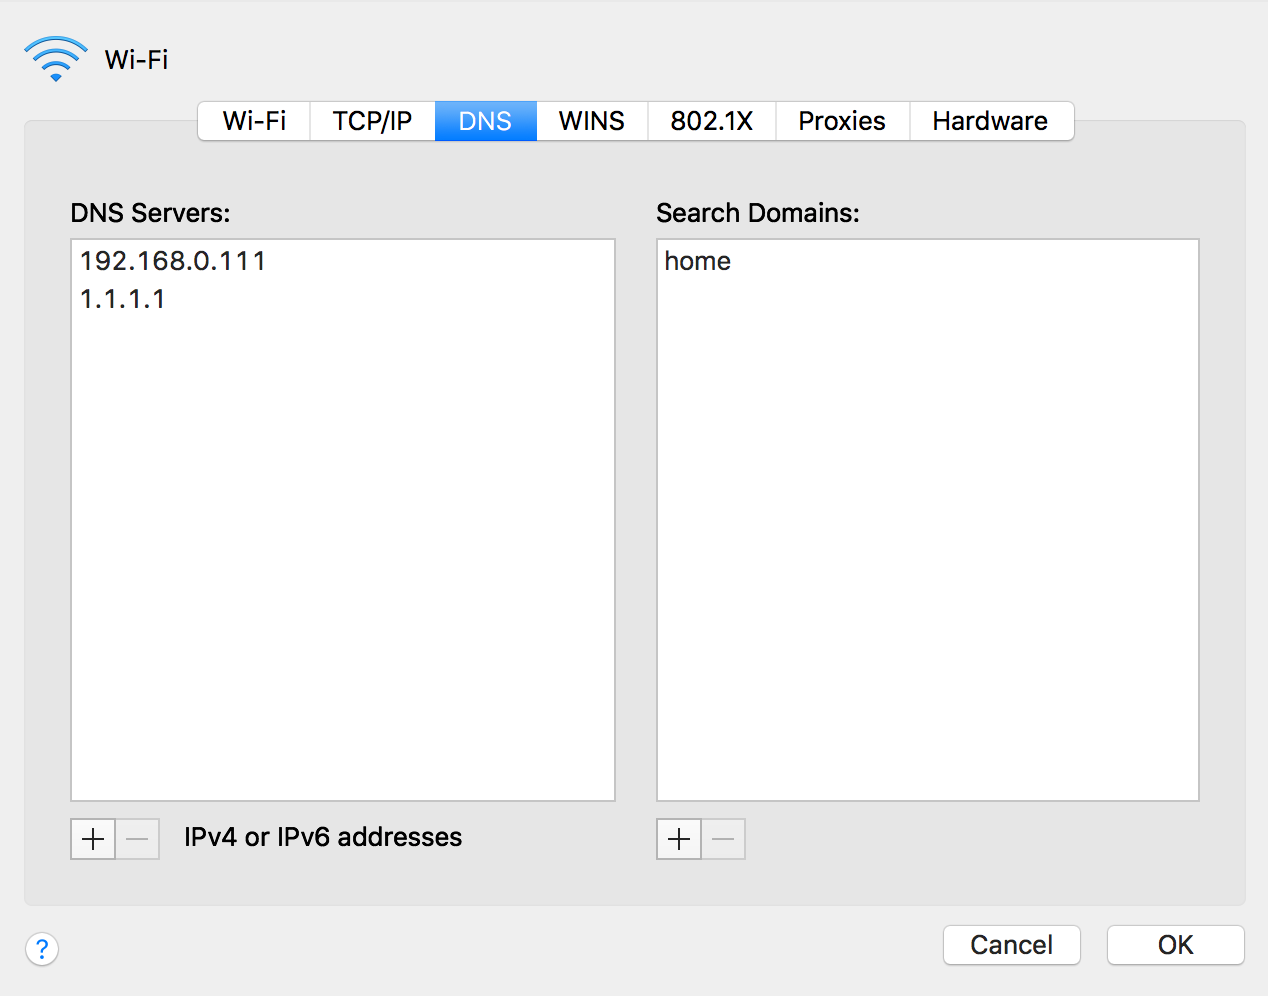
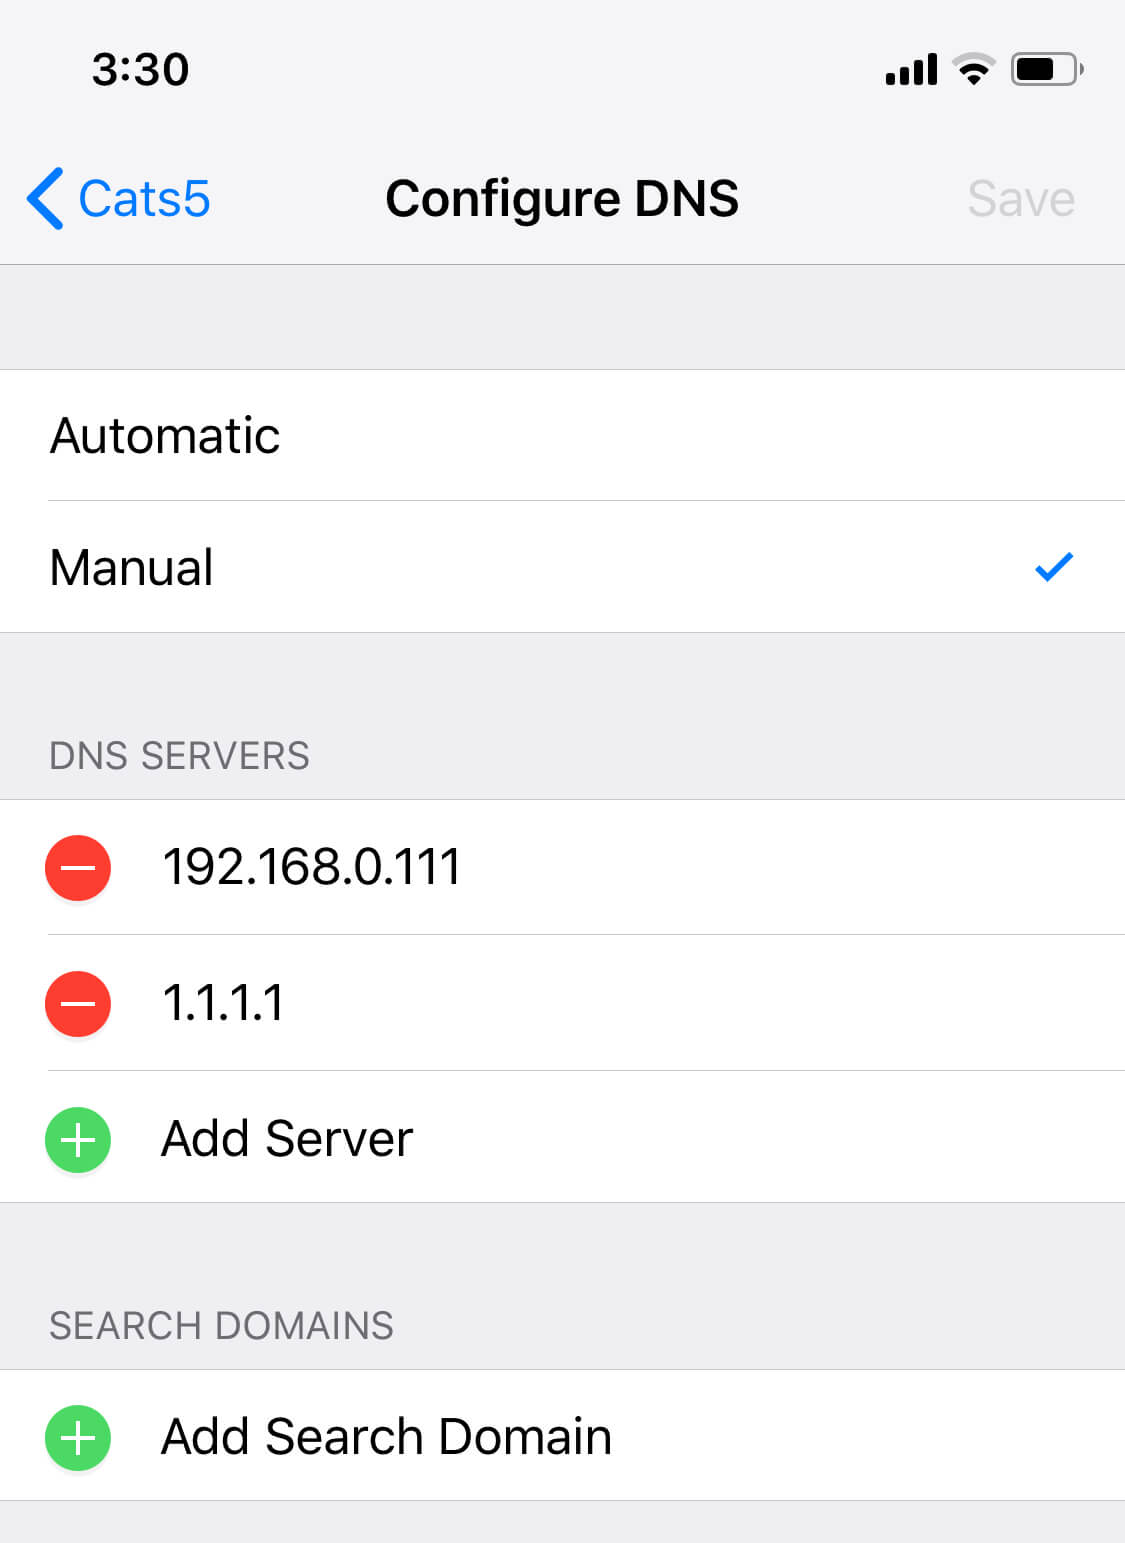
But if you want something better for filtering ads outside of Mobile Safari on iOS and on other devices, you can switch your DNS server on them to have better filtration all the time without any penalty on the battery. And if you want to have custom DNS servers for your iOS device not only in your local Wi-Fi area, you can setup DNSCrypt and have ads filtering on the DNS level everywhere you go!

Custom DNS Servers

In my summary of iOS adblockers I brought up a topic of using custom DNS servers as a better way of limiting ads and tracking and here's why. On iOS this method allows to limit them even outside Safari, which is very good news, since there are no actually working ways of keeping other apps and services from tracking you unless you jailbreak your device.

DNS

I'll be getting into details of setting custom DNS Servers and DNSCrypt on iOS since it's the most limited platform in terms of options. All of the steps below are available on Windows, Mac and Android as well, which makes it the most versatile option for the most devices possible.

So what is a DNS? DNS is abbreviated from Domain Name System - it's a special network of servers which purpose is just to resolve domains. What that means is that when you enter any address in your browser, or any app or service that you're using connects to its service via a domain, your device which allows that connection connects to its DNS server and asks for the IP address of the domain you're connecting to. If you open google.com, your computer or mobile phone asks the IP address of the domain, receives 216.58.215.78 and connects your browser to it. But if for some reason the DNS server doesn't resolve your DNS request, your browser won't know where to connect and as a result you won't see anything. This is exactly what can be used not to see ads.

DNS is a hierarchical network with few root servers at the top. The system is built to be fail safe with backup servers in each node, but from its nature there were times when a portion of them went down making parts of the Internet inaccessible to some users. For that reason ISPs (Internet service providers) have their own copies of the main DNS servers in case they might temporary fail. They keep those copies up to date with the main servers so when there's an outage the IPSs' users won't feel anything since their DNS queries will still resolve on the ISP servers. Also potentially resolving your DNS queries in place speeds up your loading speeds comparing to the situation when your DNS query would go further than your ISP servers which would just take longer to do.

Usually when you connect your device to any router, it will give you static IP addresses of the DNS servers the router is set up to share. The routers of your ISP are pre-set with their DNS servers, the same happens when your phone gets cellular connection - phone's DNS servers are also set for you. And most ISPs in order to keep users away from messing up with their Internet keep those DNS IP addresses hidden from change.

But why would you want to change your DNS servers? Well there are few reasons for that:

  1. Your DNS provider (most often your ISP) has his own non-objective interests in mind. If it's a governmental ISP in Russia, they might wanna block their subjectively harmful websites, and not resolving the DNS query for those domains is an easy way of doing it. Your browser would just tell you that it 'couldn't resolve host name'. Or if your ISP provides additional services, they might just block their online competitors that way, leaving you out only with the options they want you to have. These examples are a bit extreme, but worth mentioning since all of the scenarios are easily possible. Even though when blocking, ISPs do a bit further and just block all the traffic to specific resources and not just DNS queries. And in that case only VPNs are your only option to get around the limitations.
  2. Your DNS provider has less incentive than you on blocking ads and trackers since it sometimes might break the website you're watching or maybe your ISP shareholders are also partial owners of an advertising group, etc. And this is where your custom DNS server might help you out when your ISP won't, by setting up few rules not to resolve the domains which usually serve ads or track your online behavior and identity and afterwards sell that information again to advertisers.

As mentioned before the DNS system consists of root and other big servers that resolve people's queries from all over the world. But not only your ISP has a copy of the domain names and their IP addresses. Any private company or even regular people can set up their own DNS server. The only difference is that the root servers are operating mostly independently, following objective rules and are considered safe to be used by everyone, unlike some Joe's public DNS server. Big companies also have their own DNS servers, in particular Google with its 8.8.8.8 and CloudFare (cloud service provider) with 1.1.1.1. And even though Google is a trusted company, I wouldn't trust them to resolve my DNS queries, even though they probably filter out malicious ones for good reasons, but their core business is about ads, so they may be doing that for competitive reasons, filtering competition out, and leaving only their own domains responsible for tracking 🙂

That's why after CloudFare revealed their DNS few months ago I started using them right away, since their core business relies on making the Internet faster and safer not as a byproduct of serving ads. I couldn't switch my router to serve their DNS to all my home devices since my ISP hid the option, so I had to setup all my devices manually.

DNS-Mac

It's very easy doing it on Mac OS: you go to Settings.app -> Network, push 'Advanced' on your connection of choice (Wi-Fi, Ethernet, etc.) and on the 'DNS' tab add 1.1.1.1 and confirm the changes - that easy! You can repeat it on all of your Macs and PCs and this setting will stay even while connecting to other wireless or wired networks, neat!

On Android and iOS the DNS setting is per each wireless network. So if you use few on a constant basis - unfortunately you will have to repeat this process for each of the networks: open Settings.app -> Wi-Fi, tap on the 'i' icon next to your connected network and then on 'Configure DNS' at the bottom, select 'Manual' and enter 1.1.1.1 as well. Save changes, enjoy your faster and more secure Internet 🙂

DNS-iOS

The setup on Android is almost identical and I'm sure you will find it after going through the same sequence.

iOS adblocking options (August 2018)

After getting into a deep dive with Android adblockers I started wondering whether anything changed on iOS (my daily platform of choice) since the last time I researched this topic.

Adblock-ios

iOS adblockers were first approached by Apple with the release of iOS 9 when they introduced an adblocking API for Mobile Safari. The API was so simple and limiting at the same time that few developers pushed out a couple of adblockers literally within days after the iOS 9 worldwide rollout. And the reason was that anyone could build an adblocker for iOS in a matter of few days - it was (and is) that simple. The differentiating part is just the list of hosts (filters) to block was slightly different between the adblockers but the main idea was the same: the user had to open Settings.app -> Safari -> Content blockers and enable his adblocker of choice, thus allowing the system block the hosts included in that app. So in order to launch an adblocking app you could just scrape few filters, maybe some opensource ones and you're done 🙂

The problem was with the limited amount of filters per one app. Even though 50 000 hosts sounds like a lot, in practice it wasn't enough to block ads efficiently. I started my journey of finding the best iOS adblocker right after the new iOS release with Purify, then with Peace (which was live only for two days), Crystal and ended up using 1Blocker (which is now 'Legacy'). I decided on 1Blocker since it has a Mac app with iCloud sync of your custom filters, whitelists, settings etc.

After a year of using 1Blocker I started noticing more and more ads in Safari. It felt like the developer abandoned the app which later was proven by him releasing 1Blocker X - an updated version of the adblocker the developer supposedly was working on. Not willing to support the developer's new version which might be abandoned someday with his next work, I started searching Reddit in order to find a replacement. Some people suggested using AdGuard, others replied not to trust an adblocker made in Russia with your browsing info which made sense. People were recommending many adblockers I already tried, including 1Blocker, mostly because of its strong word of mouth. Then in the end I saw few comments recommending Wipr and seeing it's 4.8 star rating helped me to decide in its favor.

Adblock-ios2

Wipr goes around the limitation of 50k hosts by setting itself up as three content blockers all of which you should enable in the Settings.app which is quite clever. But the most important thing besides the app's clean simple interface is that it actually does the job - now I'm seeing less ads, pages are loading fast again.

Even though I now had a new working adblocker I was still unsatisfied. I couldn't believe that having only an adblocker only in Safari is the only option in fighting ads and tracking on iOS. But then I recalled that in addition to an adblocker on macOS I'm using custom DNS servers, two of them to be exact.

So if you want basic working adblocking on iOS - you now have few choices. As for additional protection you can read my followup on custom DNS servers on iOS and in general.

And if you're into complete and best possible privacy options, you can read my take on using VPNs on your devices with some specifics about iOS.

UITableView automatic cell height change with animation

UITableView-cell-resize

Today I had to update cell's height in UITableView while typing into a UITextView in that cell. After going through several approaches without any luck I stumbled on this interesting solution.
Objective-c:

[tableView beginUpdates];
[tableView endUpdates];

Swift:

tableView.beginUpdates()
tableView.endUpdates()

You call these two methods whenever you need to update the cell's height, whether you use tableView heightForRowAtIndexPath (tableView heightForRowAt)
with predefined cell height or AutoLayout with automatic

estimatedRowHeight,
rowHeight

In both cases UITableView will reload only the cell which height needs to be updated and not the whole table. And also as a nice bonus it will do that with a smooth built-in animation.

Even after few radars to include this behavior into their official documentation Apple didn't add this side-effect to the method's description, despite actually recommending such use in their WWDC 2010 'Mastering Table View' session 😊

So if you want to just change your the height of the rows in your table view, it's an easy way to do it.
You can do that in conjunction with a change of the rows in your table view.
You can also actually just do a simple Empty Update Block.
You can call it beginUpdates immediately followed by endUpdates with no actual changes to your table view.
We'll go through all the same steps here.